A Million Little Pieces
I've Been Framed
Guts and Glory
Pins and Needle Files
My Luggy Day
Searious Issues
Sliding Into Position
All Together Now
Spacing Out
Wear to Go from Here
Barreling Ahead
Breech of the Piece
Starting Out with a Bang
Round Two (hundred)
The Kart of Barrel Fitting
Fed Up
Safety is a Snap
Dispatches from the Front
Pulling Through
The Final Part
Lessons Learned
Frequently Asked Questions
Errata and Clarifications
More articles
Fed Up
Canny readers of the last chapter may have been left wondering whether or not the laboriously hand-fitted barrel succeeded in fulfilling its raison d'ętre; to wit, the elimination of feed failures. Rather than continue to leave you in suspense while writing as pretentiously as possible, I'll cut to the chase and say the feeding problems were not fixed. The gun still experienced three-point jams.
This wasn't so much discouraging as intriguing. Theoretically, adding the Kart barrel had introduced a known good part, which meant that the problem lay elsewhere. In theory, theory and practice are the same; in practice, they're not. There was still a chance some aspect of the barrel contributed to feed failures.
A guy could spend an entire book writing about 1911 feed failures, and maybe somebody should. The 1911 platform has an undeserved reputation as being plagued by feed failures, and more than one self-proclaimed expert has bestowed upon it the ignominious title, "king of the feedway jam." This is far from fair. The M1911A1, as designed, is as reliabile as it is possible for a semi-automatic handgun chambered in .45 ACP to get. Poorly-executed copies of the design are prone to failure, but then I defy anyone to find a production semi-auto that would perform well when its feed ramp geometry is changed by several degrees, its spring weights unbalanced, and its ammo fed from magazines that diverge radically from the original design.
The good news is that 1911s operate on a controlled feed principle: Rounds are controlled at three or more points during every stage of the feed cycle. (Read this thread in M1911.org's gunsmithing forum for a detailed explanation of what happens during the 1911 feed cycle.) When done right, controlled feed produces a pistol that doesn't care if it's being fired upside down, sideways, held loosely, or all of the above while flying sideways through the air, John Woo style. Because the cartridge is "handled" extensively during feeding, ramp, breech face, extractor, and magazine dimensions are more critical than in guns whose feeding cycle is looser, and therefore more random. This is good news because when something goes wrong and a dimension is out of whack, feeding is deterministic and malfunctions repeatable enough to permit diagnosis and resolution of the problem in a logical and methodical manner.
Three-point jams are caused when the cartridge forces the barrel up prematurely, wedging it against the slide and bringing the feeding process to a crashing halt. The cartridge is jammed solid at three points: the nose rests against the roof of the chamber, the brass rests on the lower lip of the chamber, and the rim sits under the extractor. Common causes include the bullet striking the barrel ramp too low, the bullet striking the chamber roof too far back, the rim being unable to rise under the extractor, or any combination of the above. Technically, these aren't even the primary causes, as symptoms like a bullet hitting the barrel ramp too low or the chamber roof too far back are themselves the result of dimensional variance that is the actual cause of the problem.
It was a complicated and thorny issue, so I started by eliminating the most common cause of feed malfunctions: the magazine. I've already written an article about 1911 magazines, so I won't go into any additional detail on the subject other than to say that using the right kind of magazines (hint: They probably won't have someone's name on them) is often the simplest and most correct fix. In this case, though, it was a non-starter: Using Colt hybrid mags reduced the frequency of jams but didn't even come close to eliminating them.
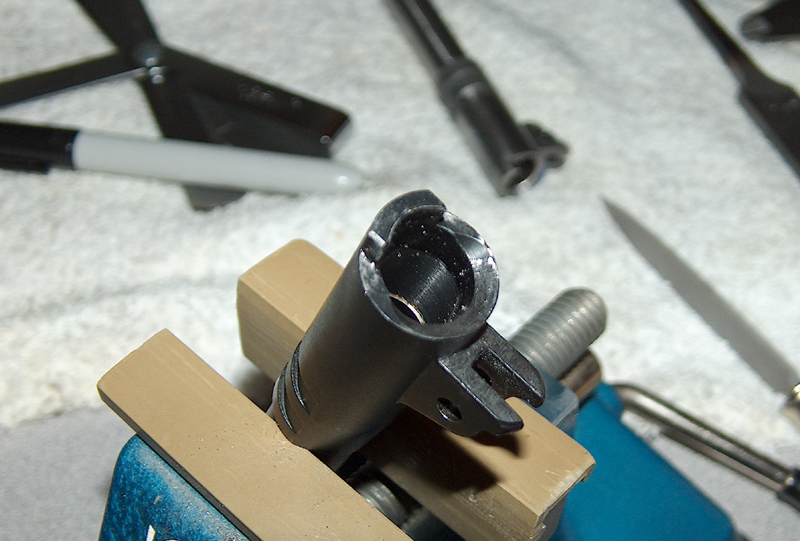
The extractor passed all tension tests and was properly beveled, and the breech face was reasonably smooth and even; they could be crossed out as well. That left something in the geometry of the frame and barrel ramps as the most likely cause. During feeding, the cartridge is pushed forward and the bullet dips into the feed ramp, striking it just below the lip, then arcs up and over the lip of the barrel ramp and into the chamber. Actual contact between the cartridge and the barrel ramp should be minimal, and the bullet should touch the frame ramp as high as is possible while still maintaining this feed principle. The subtler the hop from frame to barrel, the smoother the feed. Conversely, excessive contact with either ramp results in clunky feeding at best, and is often symptomatic of a jammer.
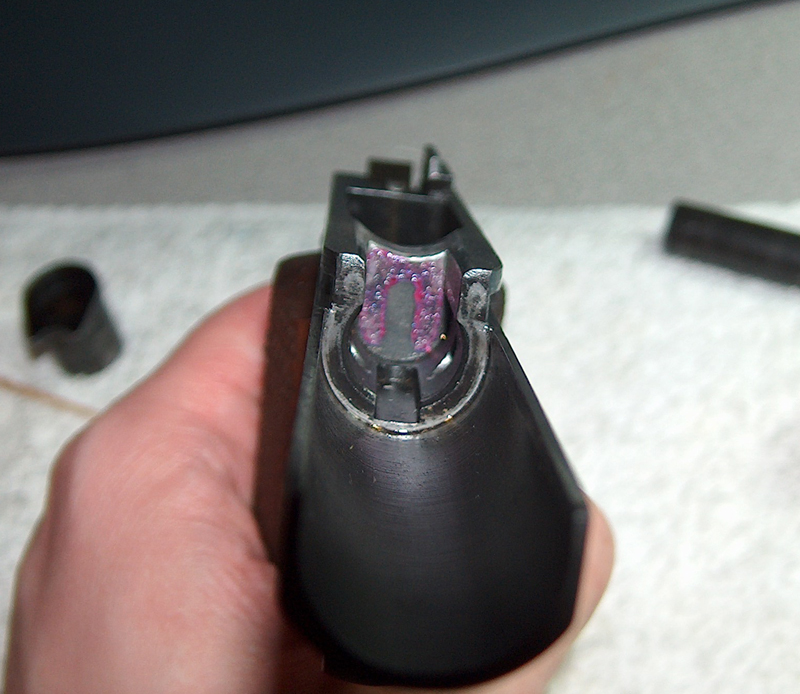
In this case, copper marks from bullets showed up quite a ways down the frame ramp and roughly halfway down the barrel ramp. I shared these facts and the following photo with the M1911.org gunsmithing photo and asked if anything jumped out at them as a possible cause:
This should work fine, right?
Several people pointed out that my barrel ramp had a sharp edge at the top. The Colt spec calls for a 0.02" radius at this point to assist the cartridge in clearing the barrel ramp. 1911Tuner mentioned that the barrel ramp looked like it sat too close to the frame ramp; spec calls for a gap of at least 1/32" here. Lazarus' experience with 1911 frame bridge dimensions led him to suggest I check for excessive frame bridge height.
Whew. Let's take these one at a time.
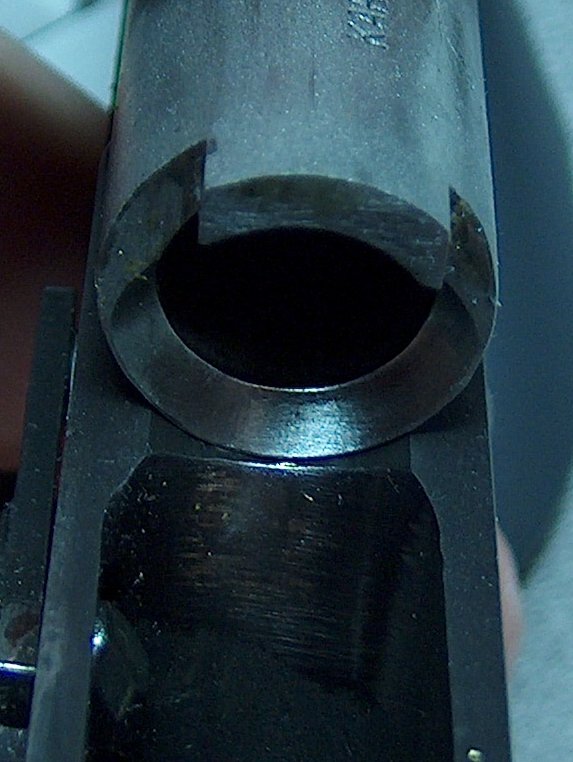
First up was the easiest fix, and one that needed to be done anyway: adding the rollover radius to the barrel ramp. At two hundredths of an inch, this is a very subtle clearance designed just to provide a little leeway for cartridges on the way to the chamber. Here's an example of the radius (actually a bevel in this case) on the barrel in my Springfield Armory Mil-Spec:
A slightly more beveloped barrel.
In addition to the radius/bevel, note the gap between the frame and barrel ramps: much larger than in the project gun. The barrel ramp is also much steeper than the one on my Kart barrel; in fact, it's pretty clear that the barrel ramp is not designed for much cartridge contact at all.
Putting a bevel on the barrel ramp probably takes a tech in Imbel's Brazilian factories about ten minutes at the most. Naturally, I spent an hour doing the same thing with some 400-grit sandpaper wrapped around a pen. The time taken could have been reduced by an order of magnitude if a Dremel had been involved, but that would have made it too easy to go too far too quickly. If taken too far into the chamber, the rollover radius can compromise case web support and cause a brass rupture. Taking it slowly and checking web support against a marked case ensured that chamber support was only reduced by a fractional amount. (Sorry I don't have any pictures, but I got so focused on the process that I forgot to take any.)
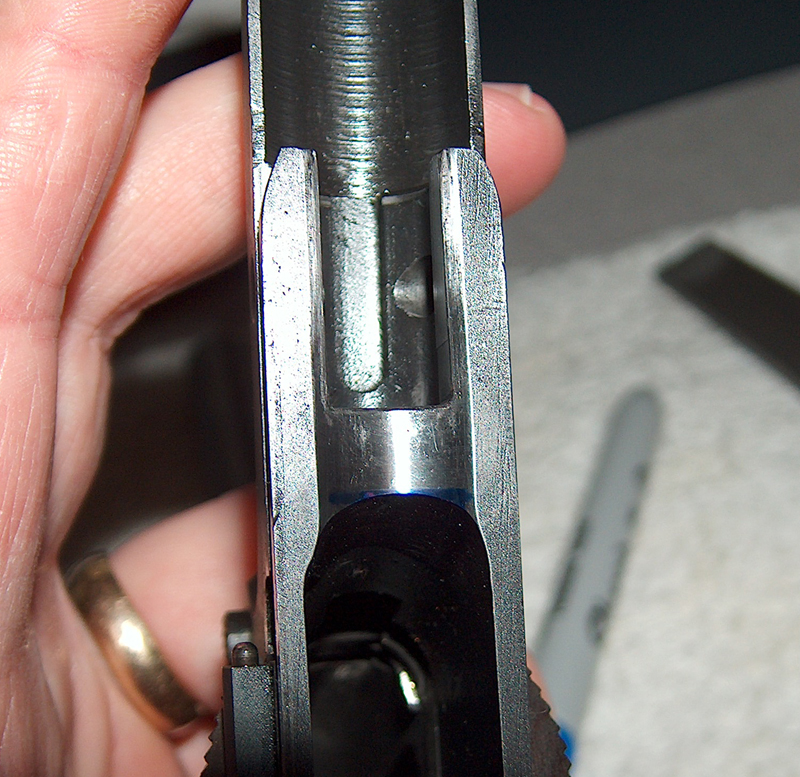
Next up was the frame bridge, the raised section of the frame between the magwell and frame bed, which is the lowered section aft of the dust cover. Lazarus pointed out that an oft-overlooked factor in feed reliability is the height of the frame bridge, which can contribute to three-point jams through two mechanisms. First, as the frame bridge rises higher relative to the top round in the magazine, rounds fed off the magazine will strike the frame ramp lower and therefore encounter the barrel at a more acute angle. Second, if the frame bridge is too high, the barrel will strike the bridge during link-down before the barrel's lower lugs make contact with the vertical impact surface. Not only does this put incredible stress on the slide stop pin, the link, the link pin, and the lower lugs (breakage of one of these parts is inevitable), but it also leaves the link in tension while the barrel is resting on the bridge. The balance of forces favors upward motion by the barrel, so a round striking the barrel ramp too low can easily induce a three-point jam.
This is a nice theory, but was it relevant to the problem at hand? Let's take a look.
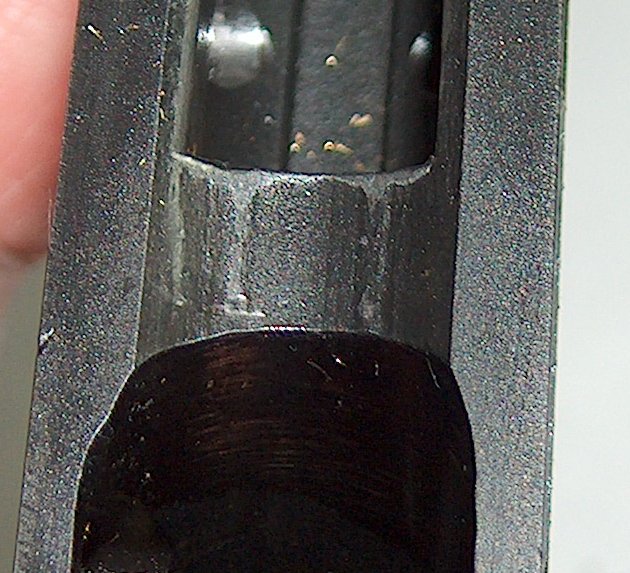
I think the barrel wants to go a little farther down.
The frame bridge showed definite hard contact from the barrel. Smearing a very thin layer of lipstick on the lower lugs and cycling the gun showed no vertical impact surface contact. If you look closely at the photo, you can see casting ridges on the frame bridge; my theory was that these ridges increased the height of the bridge just enough to hang up the barrel and prevent VIS contact. If that was the case, removing the ridges would fix things.
Lowering the frame bed requires very careful measurement and leveling and is best done with milling machine and years of experience therewith. Yet here we are. Actually, what I was doing was just dressing the bed to remove high spots and battering. Still, I was careful and took my time; in fact, taking one's time is a natural consequence of removing weapons-grade steel using only 400 and 600 grit sandpaper.
Gundon bridge is filing down.
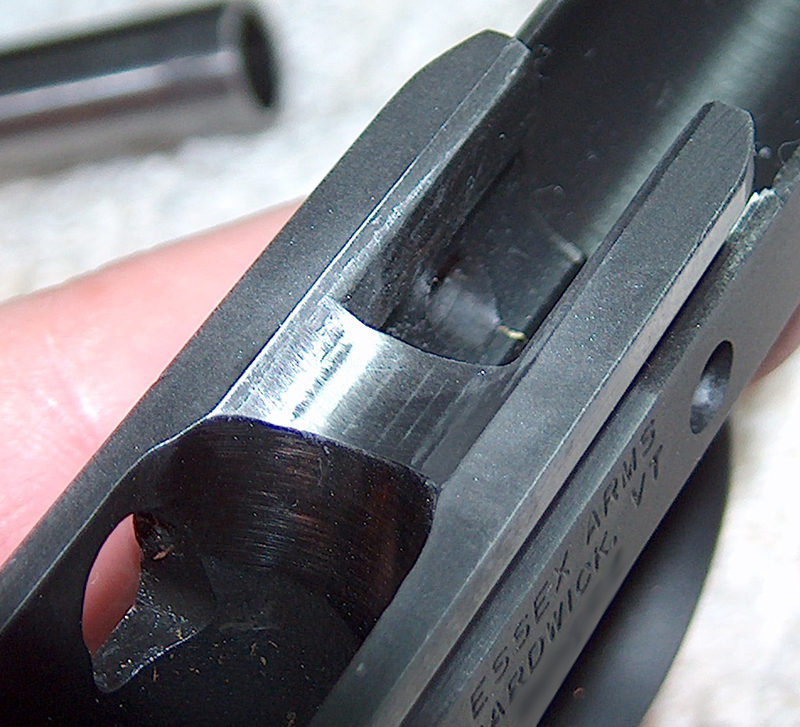
I lowered the ridges until they were almost flush with the rest of the frame bed and only the seams were visible, then tested for VIS contact again. No cigar, although a few tiny dabs of lipstick on the VIS suggested I was getting close. I evened out the surface so that the seams were gone, then took it down just a smidgen more to remove marks where the lower edge of the barrel ramp had left marks.
Bingo.
A firm smack leaves lipstick marks.
Barrel link-down was now geometrically correct; if the barrel ripped itself apart in 5,000 rounds, I'd have to blame something else. I finished things up by using the grinding wheel on my Dremel to put a bevel on the forward edge of the frame bridge, as specified by the original blueprints. (There had been a bevel on there to start, but battering from the barrel and the lowered bridge had combined to effectively eliminate it.)
As far as feed reliability went, radiusing the top of the barrel ramp and lowering the bed made a noticeable improvement...but didn't completely fix the problem. Instead of jams on every second magazine or worse, the frequency dropped to once every third or fourth mag and became more predictable: When a three-point jam occurred, it was always in the last three rounds of the magazine. These are the rounds where the magazine spring is at its weakest and the cartridge has the least support as it's stripped from the mag, thereby increasing the chances of the round entering the feed cycle at a more acute angle.
It looked like Tuner's observation of the barrel/frame ramp gap and the shallowness of the barrel ramp had been spot on. I hadn't doubted him, but the specter of moving the barrel ramp back had been scary enough to justify seeking less drastic solutions at first.
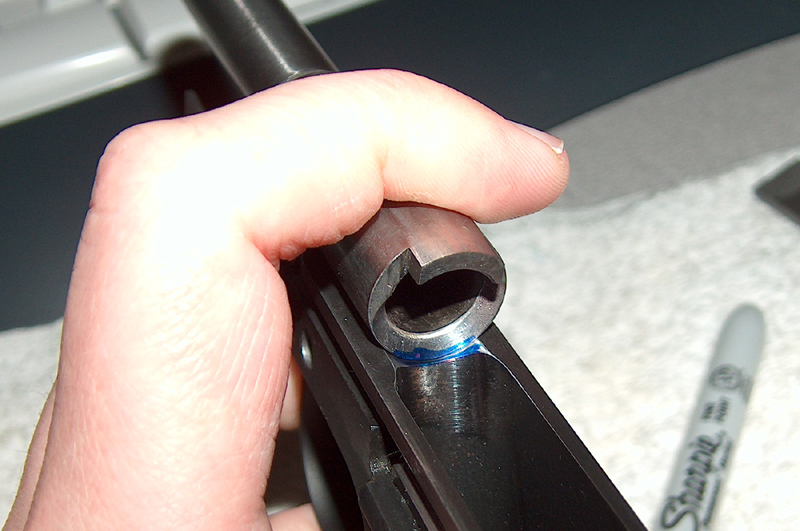
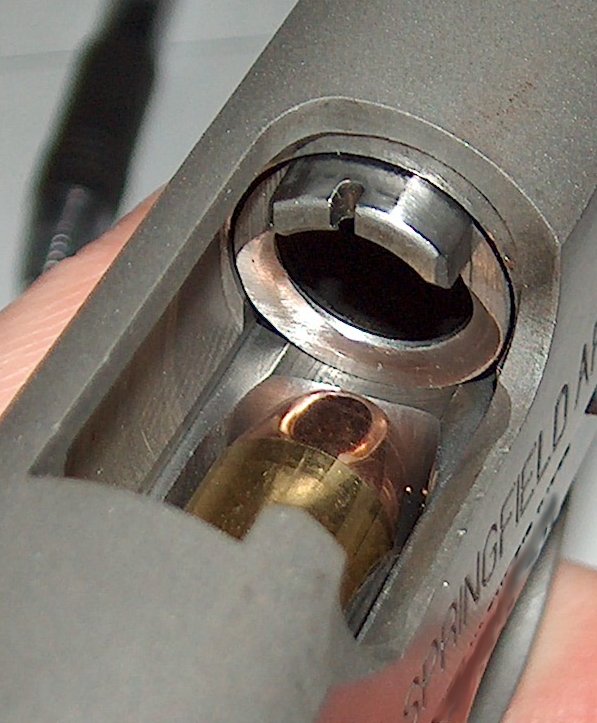
Measuring the gap.
Still, there was no denying it: The barrel sat too close to the frame ramp. Smearing the gap with a Sharpie while the barrel was held in position permitted pretty accurate measurements showing that the barrel/frame ramp gap was only a little more than half the minimum specified amount of 1/32". It had started on the narrow side, but lowering the frame bridge had brought the frame ramp in slightly, dropping the gap to just over 1/64".
The thin blue line.
1911Tuner advised me to use the method described in Kuhnhausen's first 1911 book to set the barrel ramp back. This involves using a smooth mill file at a 45 degree angle opposite the slope of the barrel ramp to take the ramp back until the desired gap is achieved. This will leave a flat wall at the base of the ramp, which can then be scraped to make a new, continuous surface. If done right, the top of the ramp doesn't move in much, if at all; it just gets steeper. Therefore, if done right, the process doesn't compromise case support.
"If done right," is the operative term here. Despite Tuner's assurances that someone with modicum of ability could perform the operation, I worried that a machinist and a computer programmer might apply different definitions of "modicum" to metalworking skill. Nonetheless, I procured a scrape and proceeded.
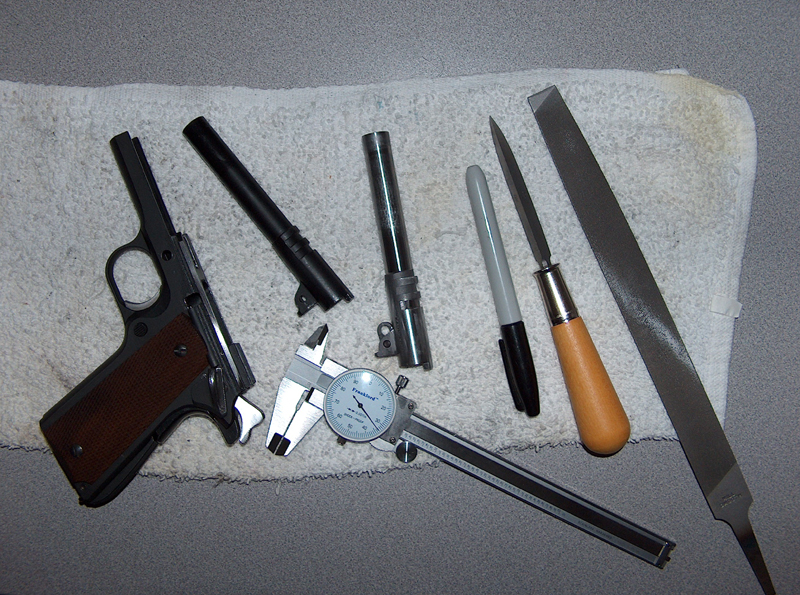
Everything you need to mangle your barrel.
Fortunately, I still had the sacrificial Roto barrel on which I'd practiced finish reaming. Once again, it would serve as the testbed for a scary procedure. In practice, it really wasn't that bad. I laid the mill file on the bench and dragged the barrel over it to file back the bottom of the ramp, checking the frame/barrel gap after every stroke, then clamped it in a vice for the scraping.
Scrape expectations.
Using a scrape is where I can really see experience vastly improving the final result. Scraping away metal takes a steady hand and some degree of strength, and works best with long, sure sweeps. I managed to get by, but the final result required some sandpaper cleanup. Just like I'd noticed the difference in effort to turn a reamer between the Roto and Kart barrel, the amount of effort required to scrape the barrel was distinct. The upshot of that was the Kart barrel, which I worked on second, didn't turn out as well as the first try on the Roto barrel. Sandpaper to the rescue once more. While I was at it, I restored the rollover radius that scraping the ramp had partially removed.
I'd like to say that taking the barrel ramp back fixed the feed issues for good, but that would be a lie. The gun saw a marginal reduction in jams, but not a complete cure. To paraphrase Sherlock Holmes, "when you have eliminated all probably explanations, whatever remains, no matter how improbable, is likely to be the first thing you should have checked." It was time to look at the frame.
To be fair, the possibility that the frame might be at fault had been a consideration from the start; however, I didn't want to spend money sending it back to the manufacturer as long as there were options I could pursue on my own. At this point, though, there was literally nothing more I could do.
If the frame was to blame, then it was likely the ramp was either too steep or too shallow. (As opposed to excessively within tolerances, I guess.) The fact that the dummy rounds I'd been using to test chambering showed noticeable bullet setback suggested the ramp was too steep; on the other hand, having to move the barrel ramp back suggested the frame ramp was cut farther in than it should be, and was therefore too shallow.
If only there were some way to know for sure.
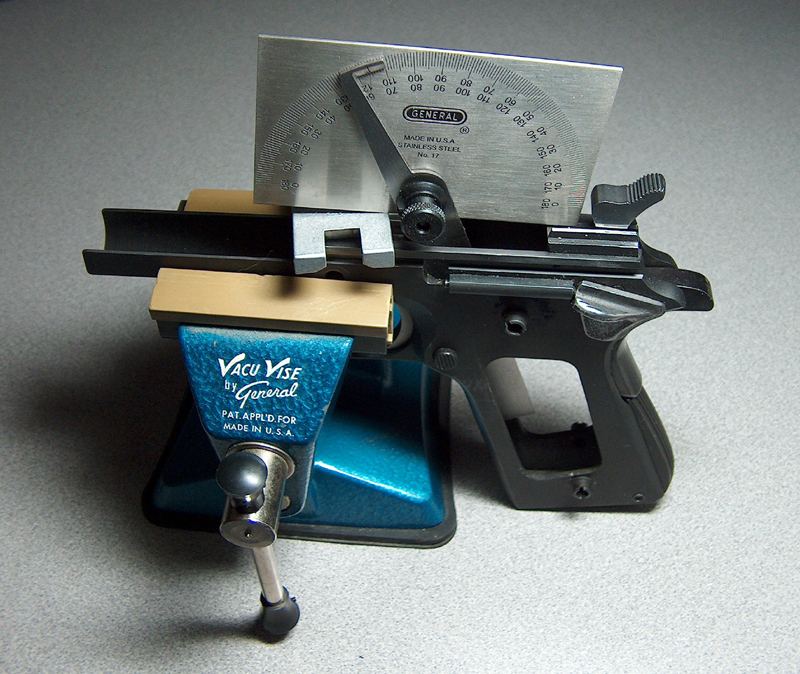
Angling for a factory fix.
I didn't have a machinist's protractor on hand, but I managed to scrounge up a woodworking protracter and trimmed down the measurement arm to the point it would fit in the magwell. The block supplied with my Kart barrel fitting kit served as a nice reference surface when rested on the rails. Although this cobbled-together setup only yielded accuracy to the nearest degree or so, the problem was big enough to be detectable even at that coarse granularity.
Specifications for the M1911 pistol degree that the frame ramp must be cut at an angle of 31 degrees, 30 minutes with absolutely no variation allowed. Mine measured approximately 27 degrees: too steep. (Ramp angles are measured from the vertical plane; that plus the different ways that "steep" and "shallow" could be interpreted was the source of some confusion on my part.) The blueprints also require the magwell to be cut at between 14 degrees, 45 minutes and 14 degrees, 55 minutes. Mine was about 17 degrees, which made it far too shallow. My magazine was tilted toward the frame ramp, which was itself too steep. Cartridges were being fed forward at a decreased angle, smacked into the too-steep frame ramp, then levered up and over the barrel ramp into the chamber. The downward angle on the magwell was making my hybrid mags feed like wadcutter mags, and my wadcutter mags feed like crap.
The simple solution would be to go out to the garage, fire up my mill, and recut the ramp. The only obstacle to this simple plan is the fact that I don't own a mill (yet). (Note to my wife: Just kidding!) (Note to everyone else: Not kidding, it arrives Thursday.) Inasmuch as I lacked the tools to fix this myself, and also seeing as how dimensions out of spec to the point that they compromised feed reliability constitute a big fat defect in construction, it had to go back to Essex.
Easier said than done. Getting ahold of Essex Arms by telephone is like pulling teeth, but I finally managed to get the go-ahead to send the frame in. UPS doesn't recognize Essex's address, but Fedex does, and I was eventually able to convince a carrier to let me give them money in exchange for transportation of the package. About a month passed before the frame was returned with a recut ramp and new bluing.
This section started off with anticlimax (the gun didn't work), so it might as well end the same way: With the fixes to the frame, the last of the feeding problems were put to rest, although I still believe this 1911 is running closer to the edge of the reliability envelope than most. Testing at the range ran into the occasional jam when wadcutter mags without sufficient spring support were used. That's likely the magwell angle coming into play; more extensive testing with good hybrid mags is required to determine whether the issue can be abrogated with good mags or will require eventual frame replacement to ensure reliability. I may be forced to shoot a lot of ammo in order to find out.
Oh darn.
email: hidi.projects at gmail.com